相关技术简介 Canvas: 作为html元素存在.提供渲染上下文用于手动绘制需要展示的内容.
OpenGL 一套规范,定义了一系列操作和显示图形的API.显卡厂家通过驱动的方式,来将对应的API调用转化为GPU指令.
WebGL 一种3D绘图协议.浏览器支持后,可以通过JavaScript调用本地OpenGL接口,从而在浏览器提供硬件3D加速渲染.
https://developer.mozilla.org/zh-CN/docs/Web/API/WebGLRenderingContext
ThreeJs 基于WebGL封装运行的三维引擎,封装了一些3D渲染需求中重要的工具方法与渲染循环.http://www.webgl3d.cn/Three.js/
3D渲染常用概念 场景 虚拟的三维世界,包含需要绘制的所有元素和参与绘制的工具.
模型 待绘制的元素以模型存在于场景中.
相机 三维场景在二维的投影会受到视角影响.
渲染器 根据场景和相机,将二维结果渲染到浏览器canvas上.
代码实操 最简单的场景实现: 1 2 3 <div id ="threejs_root" style="height: 100%;width: 100%" >id ="cell_canvas" class ="canvas" ></canvas>div >
1 2 3 4 5 6 7 8 9 10 11 12 13 14 15 16 const root = document.getElementById('threejs_root ') ElementById('cell_canvas ') new THREE.Scene() ;new THREE.PerspectiveCamera(45, width / height , 1, 5000) ;0 , 0 , 500 ); At(scene .position ) ; new THREE.WebGLRenderer({canvas , antialias : true }) ;Size(width , height ) ;ClearColor(0xb9d3ff, 1) ;
增加坐标轴 1 2 3 const axes = new THREE.AxesHelper(20000 )'red' , 'green' , 'blue' )add (axes)
支持鼠标联动 将鼠标拖动,滚动转化为相机数据,实时更新渲染结果.
1 const controls = new OrbitControls(camera , canvas ) ;
放置模型 简单的长方体. 1 2 3 4 5 const geometry = new THREE.BoxGeometry( 100 , 200 , 300 );const material = new THREE.MeshLambertMaterial({color :0xff0000 });const cube = new THREE.Mesh( geometry, material );add (cube);
加载现有的obj模型. 1 2 3 4 5 6 7 8 9 10 11 12 13 14 15 16 17 18 19 20 21 loadObj (return new Promise ((resolve,reject ) => {if (cellObj){else {const loader = new OBJLoader();'/cell2.obj' , function (obj ) console .log("obj:" , obj)0 ]
设置光源 点光源: 1 2 3 4 5 6 const point = new THREE.PointLight(0xffffff );point .position.set (100 , 200 , 0 );add (point );const pointLightHelper=new THREE.PointLightHelper(point ,10 ,0xff00ff );add (pointLightHelper);
平行光: 1 2 3 4 5 6 const directionalLight = new THREE.DirectionalLight(0xffffff , 1 );directionalLight .position.set (400 , 200 , 300 );add (directionalLight );const directionalLightHelper=new THREE.DirectionalLightHelper(directionalLight ,50 ,0x00ff00 );add (directionalLightHelper);
环境光:用于上述光源照射不到的面.会与材质颜色做混合运算. 1 2 const ambient = new THREE.AmbientLight(0x666666 );add (ambient );
点击事件 点击事件本质上是将相机位置和屏幕点击位置连起来画射线,穿过的模型就是被点击的物体.Raycaster 来完成这个功能.
1 2 3 4 5 6 7 8 9 10 11 12 13 14 15 const raycaster = new THREE.Raycaster();onMouseDown (window .innerWidth) * 2 - 1 ;window .innerHeight) * 2 + 1 ;this .camera);var raycasters = raycaster.intersectObjects(this .scene.children);if (raycasters.length > 0 ) {const object = raycasters[0 ].objectconsole .log('命中的第一个模型:' , object )
简单的点击特效:发光外壳 使用效果组合器接管渲染器.
1 2 3 var renderPass = new RenderPass(scene , camera ) ;new EffectComposer(renderer ) ;Pass(renderPass ) ;
将
1 this .renderer.render(this .scene, this .camera);
替换为
1 this .composer.render(this .scene, this .camera);
在效果组合器中增加一个轮廓处理器.
1 2 3 4 5 6 7 var outlinePass = new OutlinePass(new THREE.Vector2(window .innerWidth , window .innerHeight ) , scene, camera);new THREE.Color(1, 1, 1) ;new THREE.Color(1, 1, 1) ;3.0 ;3 new EffectComposer(renderer ) ;Pass(renderPass ) ;
点击事件中,为轮廓处理器设置目标对象.
1 2 const object = raycasters[0 ].object this .outlinePass.selectedObjects = [object ];
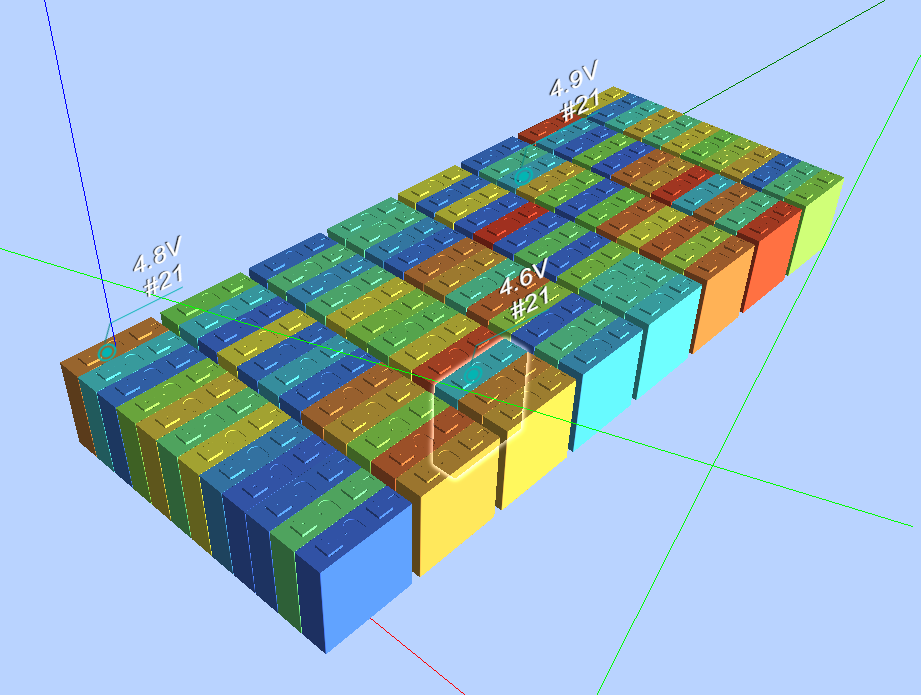
增加2D弹窗 简单的2D弹窗通过单独的渲染器CSS2DRenderer配合CSS2DObject实现.
直接在canvas同级添加一个element,并和Render绑定.
1 2 3 const labelRenderer = new CSS2DRenderer() ;Size(root .clientWidth , root .clientHeight ) ;Child(labelRenderer .domElement ) ;
使用dom element创建CSS2DObject,像添加3D模型一样添加到场景中.
1 2 3 4 5 6 7 8 const div = labelLayout.cloneNode(true );style .visibility = "visible" ;0 ].childNodes[0 ].textContent = item.vol + 'V\n#21 ';label = new CSS2DObject(div);label .name = item.namelabel .position .copy (copyObj.position );//这里直接使用对应3D模型的坐标.label .translateZ(40 )//沿Z轴上移,显示效果为悬浮在对应模型上方.scene .add(label )
渲染时,将CSS2DRenderer一起执行即可.
1 this .labelRenderer.render(this .scene, this .camera);
动画效果的实现. 屏幕显示的内容本质上是镜头和场景共同作用的结果.
简单的视角改变,可以用通过镜头的位移和角度实现.
模型动画,需要单独修改场景甚至指定模型.
示例:
1 2 3 4 5 6 7 8 9 10 11 12 render() {this .composer.render(this .scene, this .camera);this .labelRenderer.render(this .scene, this .camera);this .render);if (animating1) {this .calAnimatPositions1()else if (animating2) {this .calAnimatPositions2()else if (animating3) {this .calAnimatPositions3()
三段动画:
1 2 3 4 5 6 7 8 9 10 11 12 13 14 15 16 17 18 19 20 21 22 23 24 25 26 27 28 29 30 31 32 33 34 35 36 37 38 39 40 41 42 calAnimatPositions1() {this .camera.position.x -= 2 ;this .camera.position.z -= 1 ;this .camera.lookAt(0 , 0 , 0 );if (this .camera.position.z < 25 ) {this .camera.position.z = 25 if (this .camera.position.x <= 0 ) {false true this .camera.position.y -= 2 ;this .camera.position.z += 1 ;this .camera.lookAt(0 , 0 , 0 );if (this .camera.position.z > 100 ) {this .camera.position.z = 100 if (this .camera.position.y <= -300 ) {false true this .camera.position.y += 2 ;if (this .camera.position.y <= 0 ) {this .camera.position.x += 2 ;else {this .camera.position.x -= 2 ;this .camera.lookAt(0 , 0 , 0 );if (this .camera.position.y >= 300 ) {false
总结 ThreeJS提供的功能还远不止于此.纹理/精灵/骨骼等高级应用可以完成更酷炫和实用的需求.https://threejs.org/docs/index.html#manual/zh/introduction/Creating-a-scene http://www.webgl3d.cn/Three.js/ https://sogrey.top/Three.js-start/start/#top
